SharePoint 2013 List Forms: New Small Framework Project to Store List Forms in SharePoint Library (Part 1)
I spend some spare time in the last weeks and the last days (in Redmond before the MCSM: SharePoint rotation starts in a few hours ;-) ) for a new private development project. It focuses on custom list forms for SharePoint 2013. – Another article of my blog is one of the most recognized one regarding to the statistics: https://blog.kenaro.com/2010/12/29/walkthrough-create-custom-sharepoint-2010-list-form-for-deployment-in-a-visual-studio-2010-project/ - So I decided to write another article in this context in connection with another plan of mine to create a small framework to enable custom list forms that are stored directly in a SharePoint document library and which are connected with the content types automatically.
I release the source code there:
http://splistforms.codeplex.com
There is no “binary distribution”, because it’s “alpha”. – You will use it at your own risk – as always. Remember: It’s a private development project and I publish it for demonstration purpose only!!
**These are the goals:
**
- Create a SharePoint list where list forms for content types are registered. - When creating a new form in this list it gets automatically registered on the content type.
- The list form has 3 different form modes: New, Edit, Display. All can be set individually.
- The list forms are rendered by using controls stored in a SharePoint document library. – The default SharePoint “Rendering Template” mechanism is used.
- The custom list form control can be edited with SharePoint Designer or by using another Editor by opening the control file in a mapped network drive.
All this based on SharePoint rendering templates. There are lot of articles out there that cover that topic.
Some information here:
Each content type in SharePoint has some properties related to “form templates” that can be set using C# or the declarative way.
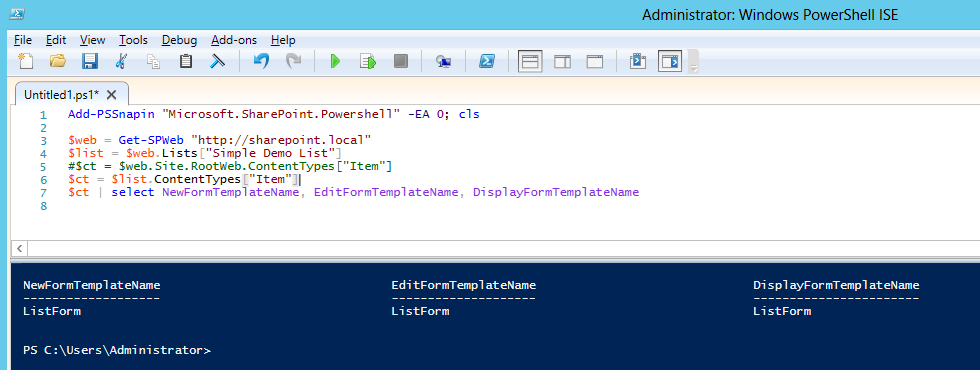
Let’s have a look into the settings of the content type “Item” of a simple custom list.
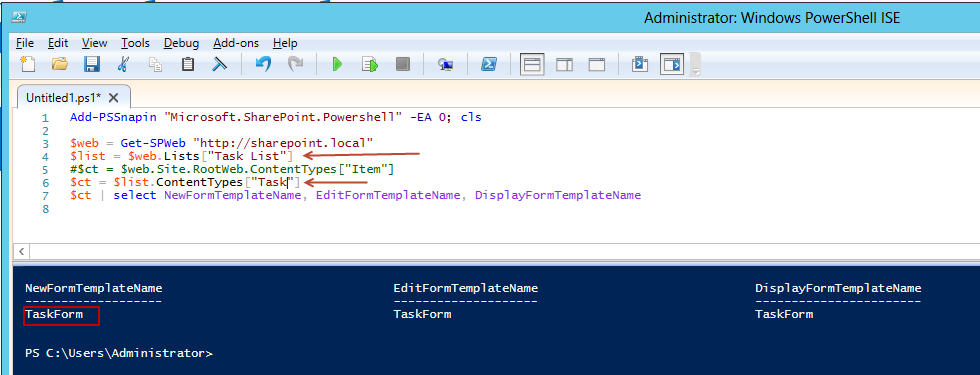
Here you see all form templates are set to “ListForm”. That is the default setting. – Other lists such as task lists use different default settings like this:
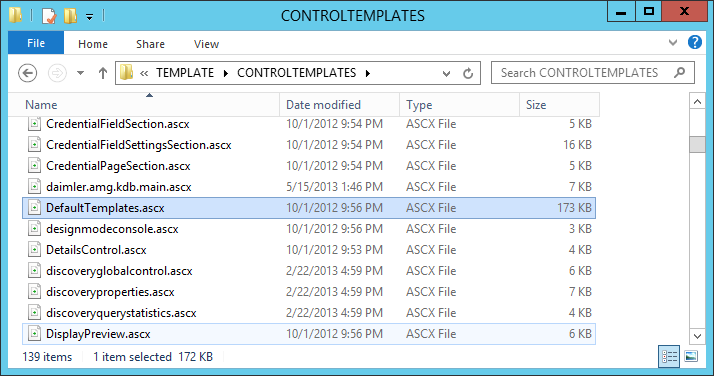
“ListForm” and “TaskForm” are so called “rendering templates” that is taken from a certain file in the 15 hive: <15>\TEMPLATE\CONTROLTEMPLATES\DefaultTemplates.ascx
Looking into the file:
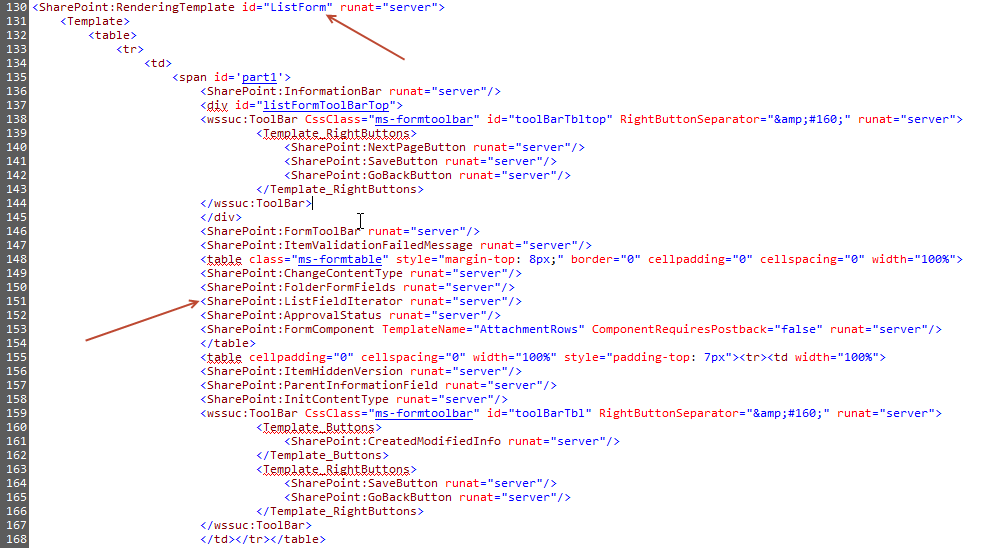
Here you find the rendering template “ListForm”. It defines how to create the forms HTML codes at rendering time. – Look at the “ListFieldIterator” tag. It will generate HTML code for all the fields in a SharePoint list. It’s very generic!! (The whole rendering mechanism is one of my favorite peace of code of SharePoint J )
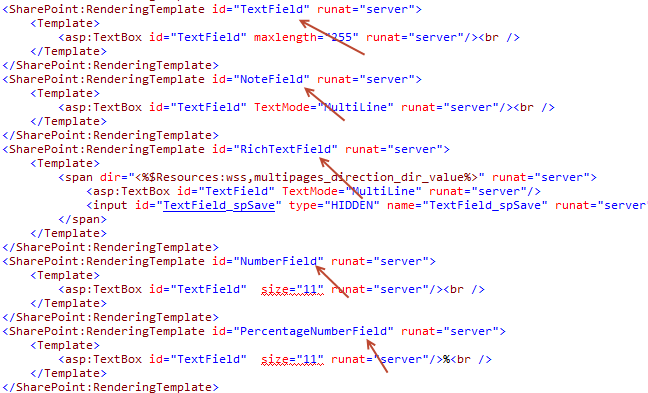
Also for rendering the fields (“columns”) there are rendering templates that will be used by the “ListFieldIterator” at some point of rendering. For example:
You can create your own rendering templates for use with content types. Just add a .ASCX file to the CONTROLTEMPLATES folder of the 15 hive that contains a rendering template in this fashion. (You cannot use a sub folder below CONTROLTEMPLATES!!) Then set the property of the content type to the rendering templates name and it will be used to render your list form. – This is what my framework does.
**In the first article I want to show you the result of this project.
**
**In the second article [coming soon] I want to show you how it works behind the scene of the framework.
**
**In the third article [coming soon] I want to show you how to create a SharePoint project to deploy custom list forms that uses the framework.
**
Let’s start…
1. To start the demonstration I need to create a simple custom list with some columns. I name the list “Simple Demo List” and create 4 columns:
- “Date” => date and time column
- “MultiText” => multiple lines of text column
- “User” => person or group column
- “YesNo” => Yes/No column
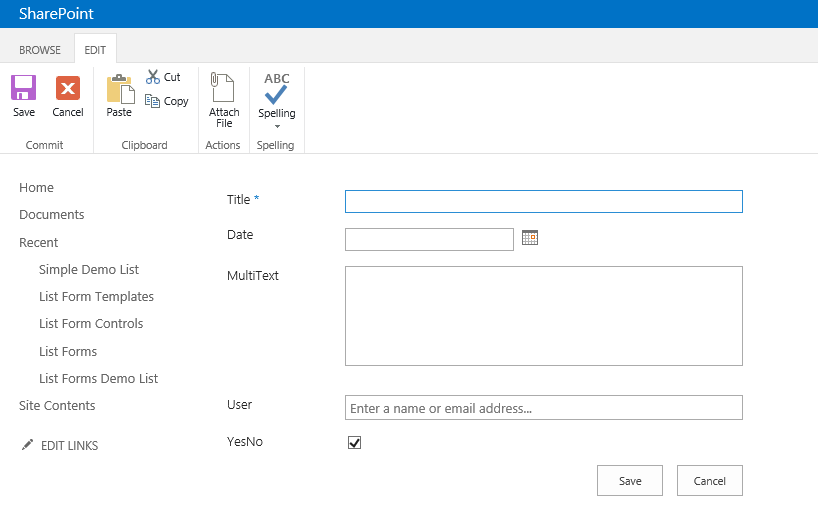
2. This is how the default new form of the list looks like:
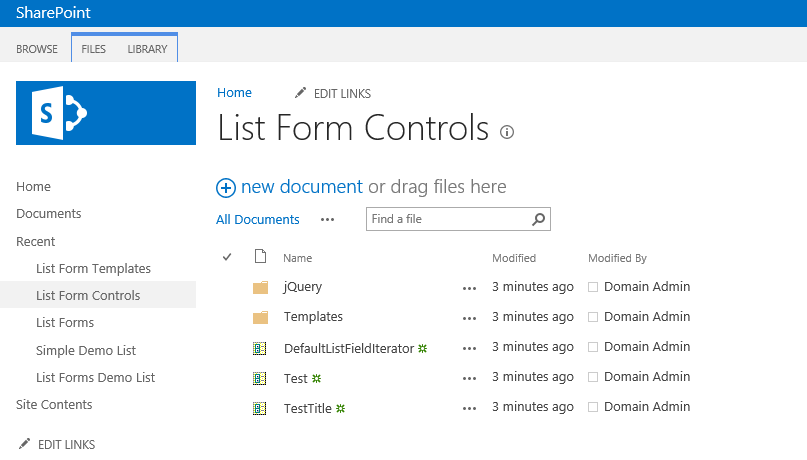
3. Now I want to create my own list form for this list using my brand new framework. – Therefore I want to show you the two lists and one library it consists of:
-
“List Forms” : This list contains all custom form registrations made by the framework. Here you can create new forms. An event handler will create the controls derived from the chosen templates register them on the content types.
-
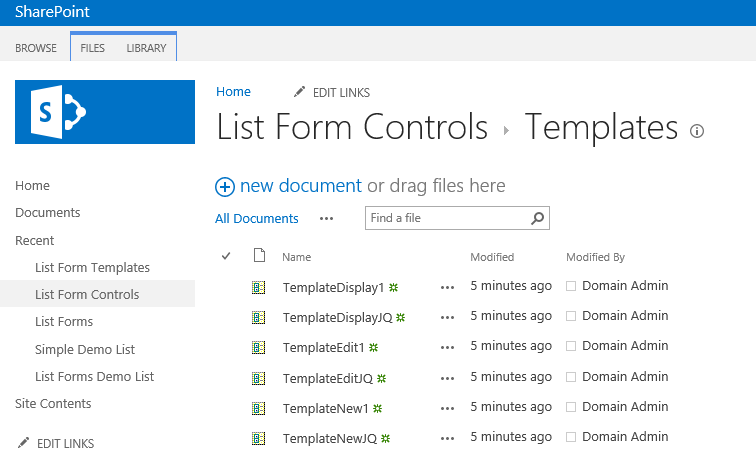
“List Form Controls” : This library contains the list form controls, the templates and additional jQuery libraries.
-
“List Form Templates” : In this list you can register new templates that will be used to create new forms.
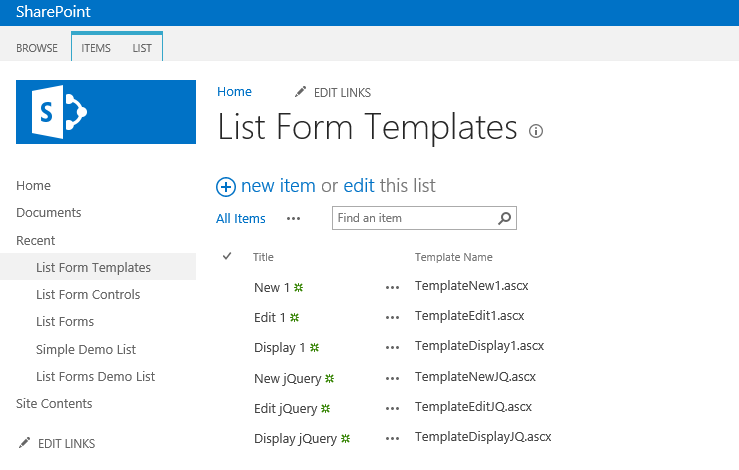
This is a simple list that refers to the “Templates” folder of the “List Form Controls” library:
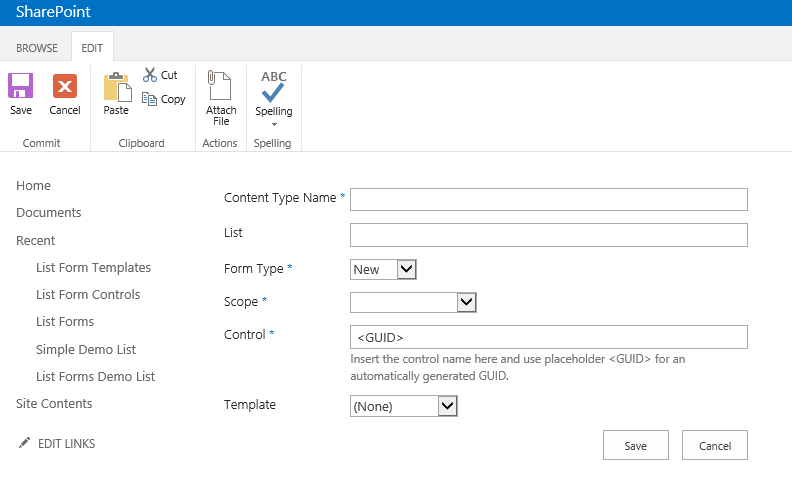
4. Now I want to create a “New Item” form my “Simple Demo List”. Therefore I add a new item to the “List Forms” list:
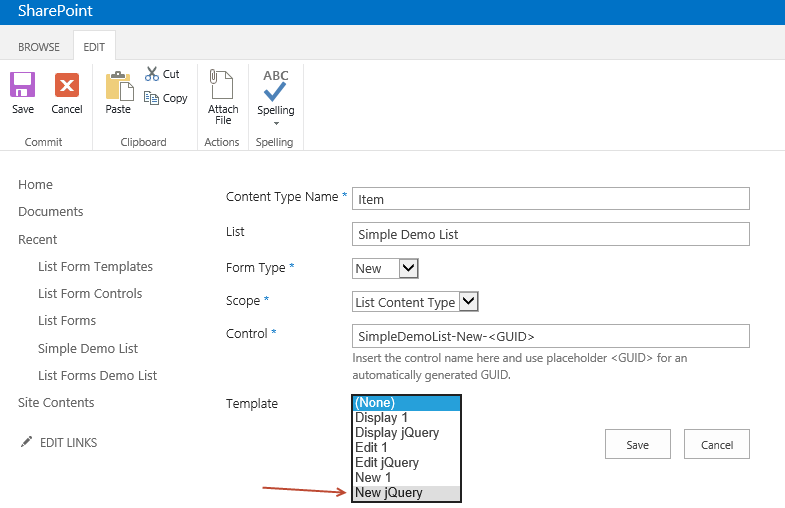
Here you enter all information needed to identify the content type for which you want to create form. You can choose a form template. I have included to kinds of templates:
- Plain templates that use the same rendering template as the SharePoint default “ListForm” template.
- jQuery enabled form templates that allow you to use jQuery for customizations.
I choose “New jQuery” as template.
Before we hit “Save” let’s have a look at the content type using PowerShell. (It’s the same screenshot as above in the “rendering template” excursion at the beginning of this article…)

All forms are set to their defaults: “ListForm”
Now I hit “Save” on the new “List Forms” list item to create my own form.
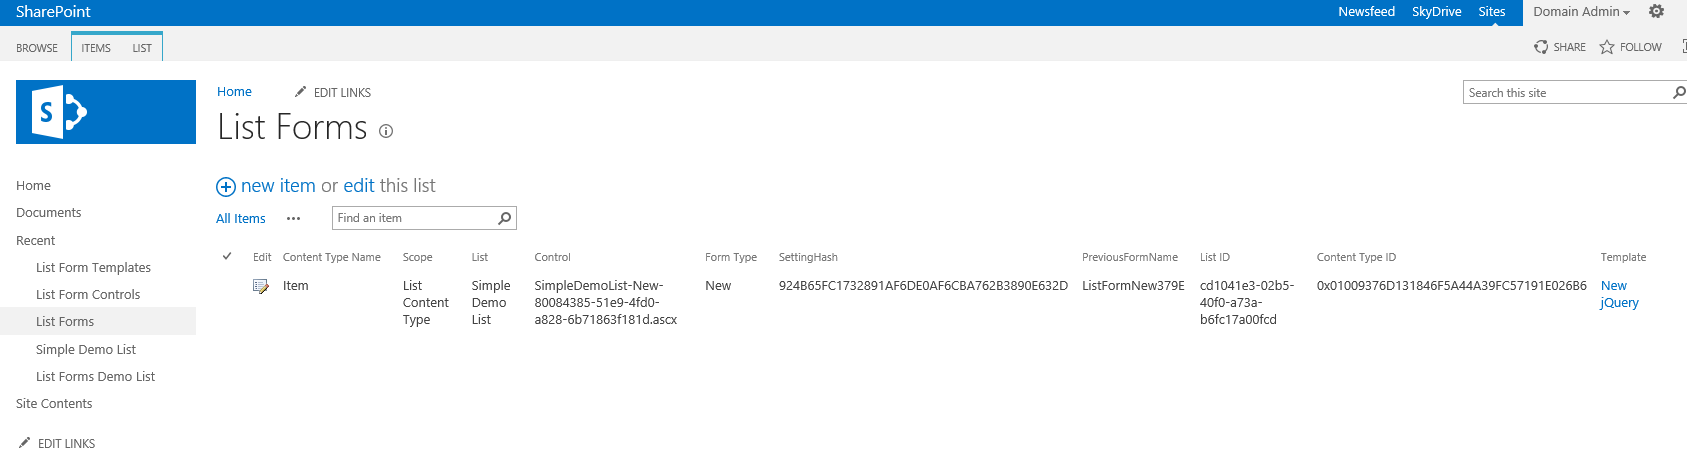
After that the list view of “List Forms” looks like this:
What happens here:
-
The chosen template file is taken from the “Templates” folder of the “List Form Controls” library. A new name is created using the naming template “SimpleDemoList-New-
”. The new control is saved using this name in the root folder of the “List Form Controls” library. -
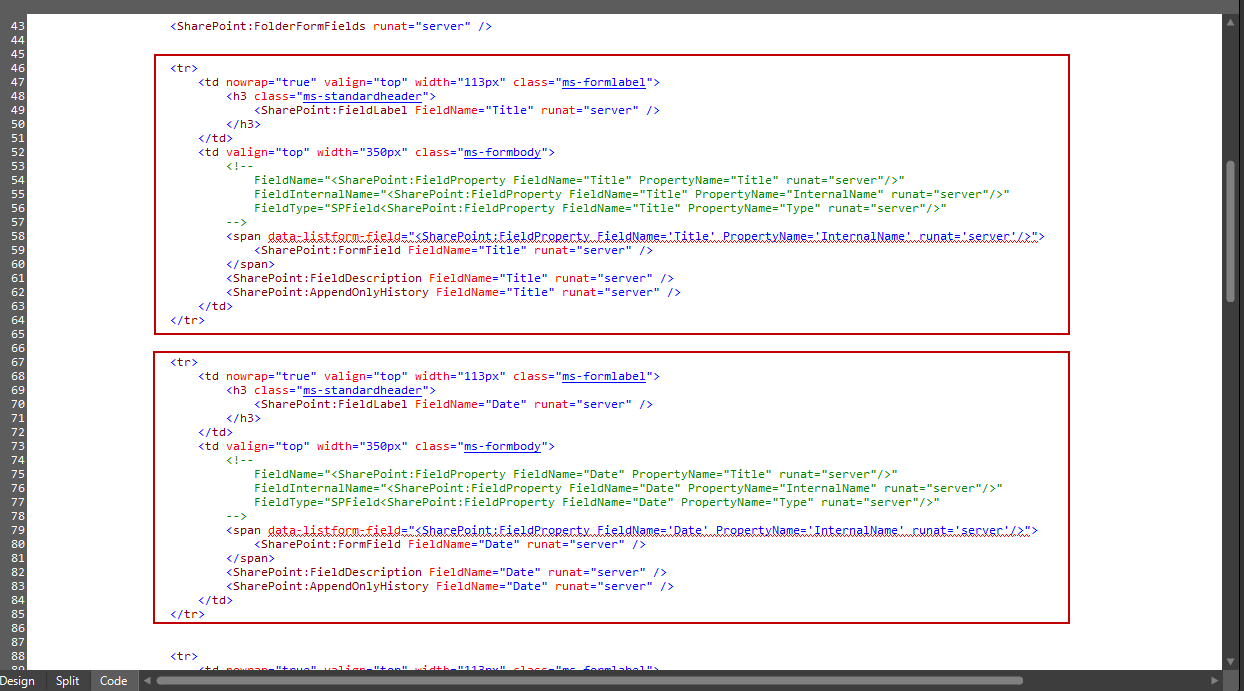
Inside the new control file there is a template for the list columns. This template will be taken and reproduced for each (visible) field (list column). Then the template in the new control file is replaced by the list column entries. – Here is the template file:
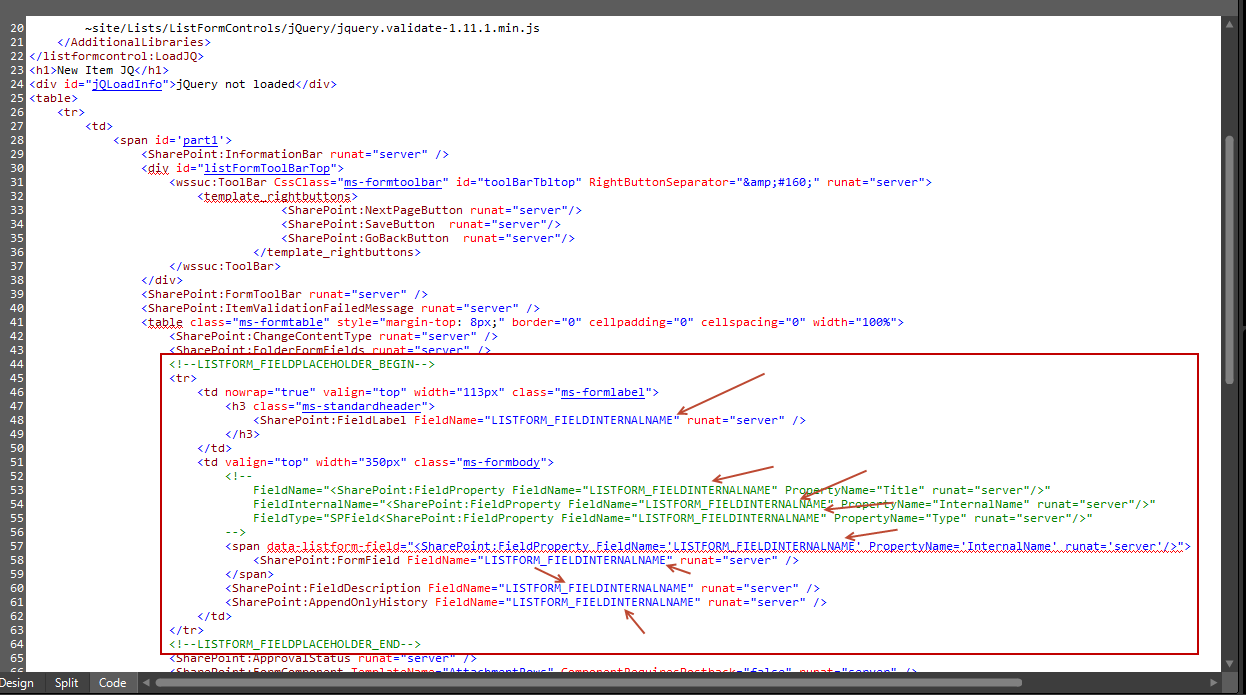
The whole template between the marks “LISTFORM_FIELDPLACEHOLDER_BEGIN” and “LISTFORM_FIELDPLACEHOLDER_END” will be instantiated for each list column. Inside all marked placeholders (“LISTFORM_FIELDINTERNALNAME”) will be replaced by the list columns internal name.
-
Than a new rendering template is registered on the list content type “Item” on the “Simple Demo List”. – Let’s look into it using PowerShell again:
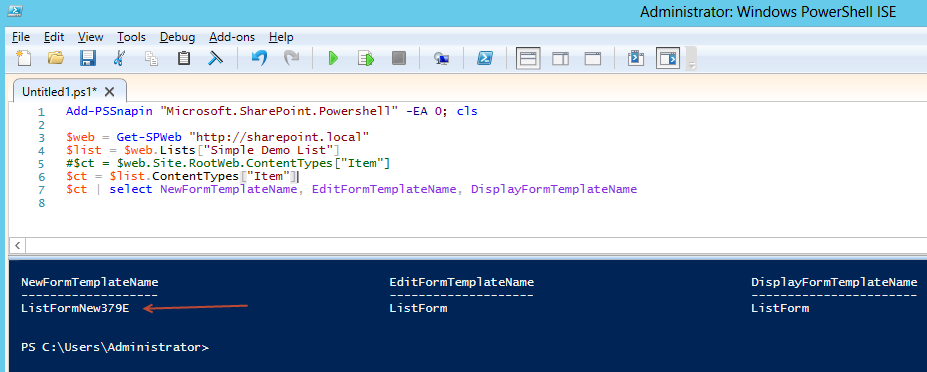
Now the “NewFormTemplateName” is “ListFormNew379E”. This is the indicator that my framework will be responsible for rendering the list form.
-
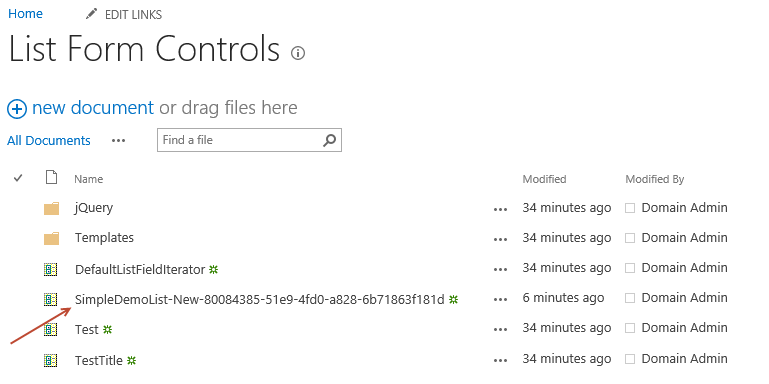
Let’s have a look into the “List form Controls” library. Here you will find the new control:
-
I open the control using a mapped network drive:
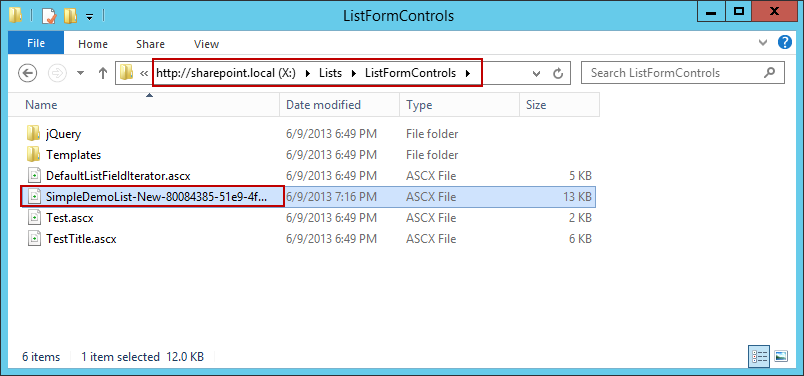
In it you see HTML code sections for each list column. These entries are generated automatically using the template file and the “item template” inside the template file.
5. Now let’s use the new form. Just open the list view of “Simple Demo List” and hit “New Item”.
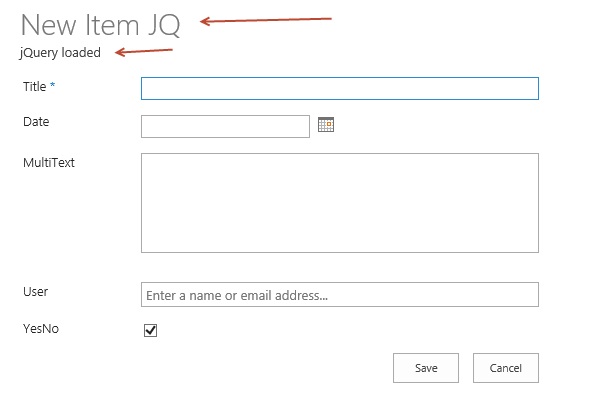
This is our jQuery enabled form!! It works in an instant!!
The text “jQuery loaded” is generated at runtime when jQuery could be loaded. (This can be removed of course.) – This framework supports loading jQuery from library “List Form Controls” if it’s not present though the page, e.g. the master page. It also supports loading additional libraries.
To support jQuery and to allow you to use if for your own purpose there are two controls in the control file:
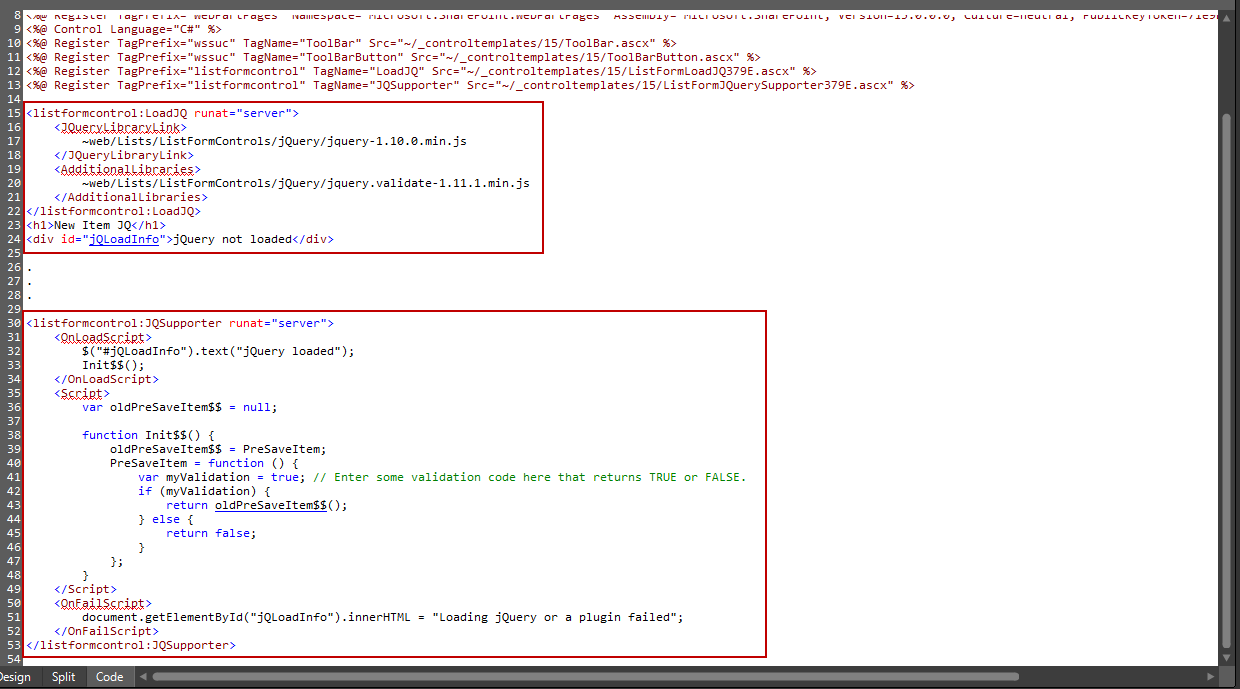
The first one (“LoadJQ”) is responsible for loading jQuery and additional libarires. (One library per line in “AdditionalLibraries”. Supported placeholders are: “~site” for the server relative site collection URL and “~web” for the server relative web URL.)
The second one (“JQSupporter”) can be used to store own code. As an example I’ve replaced the default “PreSaveItem” handler of SharePoint with my own handler in order to support my own validation mechanism before saving the item to be able to cancel the save action.
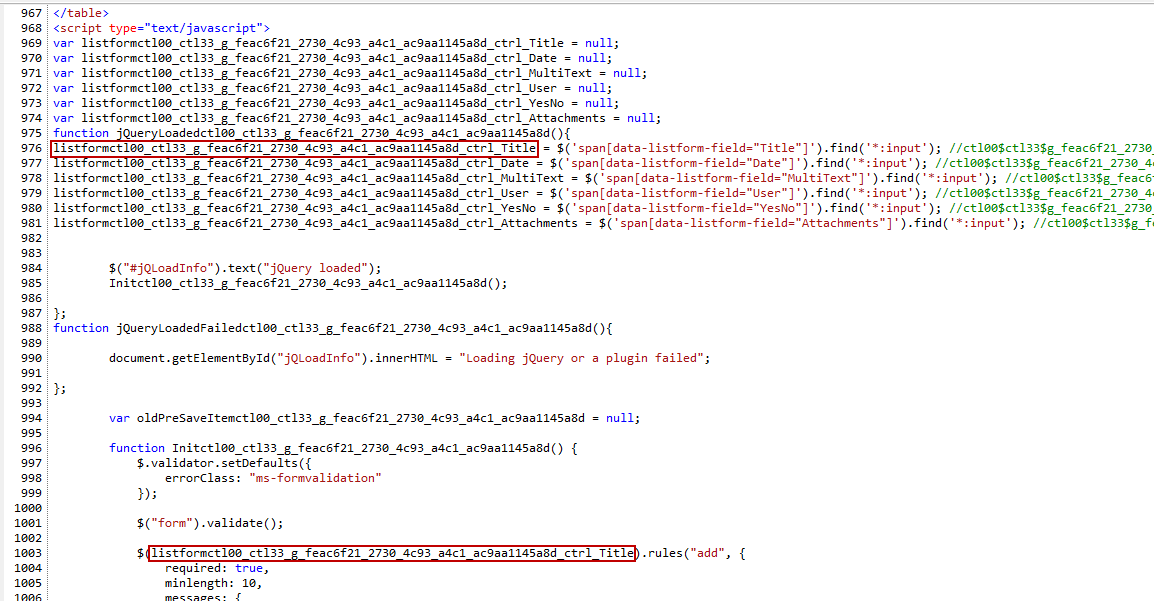
6. Now I want to add some new functionality to my control. Let’s say we want to ensure that title has at least 10 characters.
Therefore I modify the JQSupporter control in the control file using Expression Web 4 on the mapped network drive.
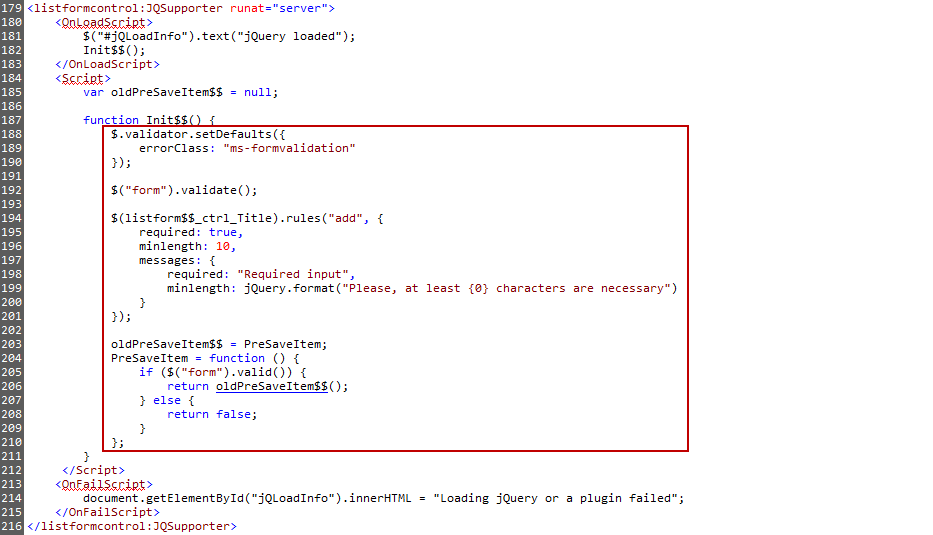
The ”$$” I’ve used there will be replaced at rendering time with the ASP.NET ClientID of the List Form. This should be used to prevent naming issues. (To use ”$$” as characters inside the script just use ”\$$” as escape sequence.)
The variable “listform$$_ctrl_Title” is generated automatically by the JQSupporter control. For each visible list form control you will get such a variable “listform$$_ctrl_
This is how the source looks like at client side:
Let’s test it:
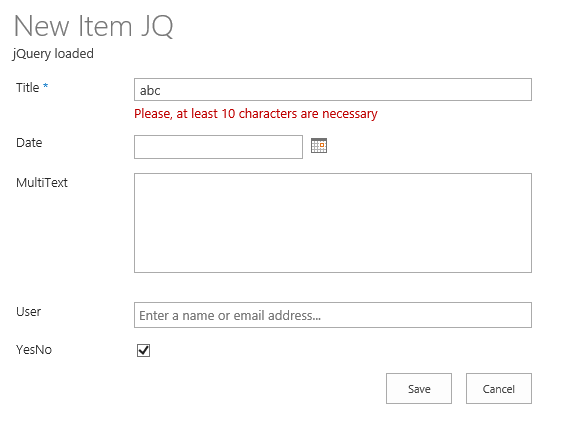
It works. J
7. Now you are able to customize forms very quickly. “Normal” users only need read permissions on the lists/library “List Forms”, “List Form Controls”, “List Form Templates”.
All settings should be part of a normal SharePoint backup, e.g. Backup-SPSite. I’m not sure it would be part of an SharePoint Export. … I checked the exports Manifest.xml file and I can see the content types form setting is exported. Because of all controls and settings are in SharePoint lists and libraries it should be possible to include this in a SharePoint Export/Import or deployment process. – It should be possible too to save the settings in a site template. (However… you always need to add the SharePoint solution as full trust solution to your farm.)
Limitations:
- It’s alpha!!!!!!!!!!!!!!!!!!!!!!
- It is hardly tested!!!!!!!!!!!!!
- It does not support removing the custom form from the content type. – That can be done through PowerShell by setting the form property back to the default value (“ListForm” or “TaskForm” or what ever…).
- It should work with site content types but I’ve not tested it yet. I have commented out it.
- It does not handle errors if they occure.
- It’s not performance tested!
- It has no management interface. Only the lists and libraries I’ve described above. They should be hidden. You could hide them easily.
Next steps:
- Management interface
- “Remove List Form” support for event handler on list “List Forms”
- Field Rendering Templates.
Please feel free to make comments if you like it – or not like it.